
Home About Information & How To's Products Gallery Links Contact
Tutankhamun Sling Tutorial I
I have reproduced these instructions here from my earlier website, as I think they are still useful. However, the written directions at the bottom for reproducing the original sling from Tutankhamun's tomb are perhaps out of date, because since I put them together, I have made another tutorial for making such a sling (which can be found here), and if you are considering making one I recommend looking at both tutorials to get a better idea of some of the options.
A Method for Reproducing a Sling Found in the Tomb of Tutankhamun.
One of my first sling research projects was to try to discover a means of making one of the slings found in Tutnakhamen's tomb. I came up with a method that used a triangular loom, which was warped on both sides. The loom produced satisfactory results, but it was somewhat complicated, and rather time consuming to use. My younger brother was watching me use one of my looms, and he thought up a way to weave a Tut pouch on a flat loom. I tried the method out, and found to my satisfaction that, aside from being more straightforward and easier to learn, it was noticeably faster and produced a tighter weave. Also, The ancient Egyptians are known to have used looms that my brother's method could be done on, so it is perhaps a more authentic method. How the original slings were made will probably never be known for sure, but at least this method could have been used.
In order to make the instructions easier to understand, I have simplified the design somewhat. This pouch contains only 20 warps, whereas my best estimate of the original is 48 warps. I have left out the stripe of contrasting color, and have used a thick linen rug warp. The size of pouch that is made from these instructions is smaller than most sling pouches, but is just about right for Roman-like lead ammunition. At the bottom of the page are directions for making a sling close to the original Tut sling.

Materials:
About 100ft of 8/6 linen rug warp.
Tools:
A pair of scissors or a sharp knife.
A needle with an eye large enough to accommodate the rug warp.
A loom.
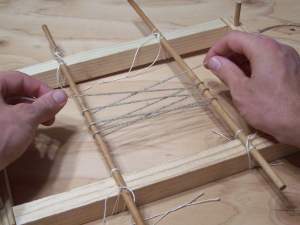
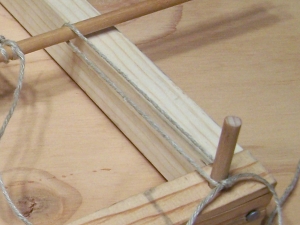
All that is required for a loom is a small rectangular wooden frame, two dowels, and some string. The loom in the photographs was made for the purpose, but a picture frame of the right size will work just as well. The upright pegs are not a necessity. When the time comes, the dowels can be tied right to the ends of the frame when the warping is finished.
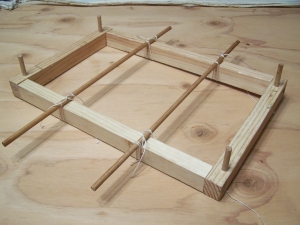
Begin by lashing the dowels across the loom frame. There should be 4-5 inches between the two dowels.
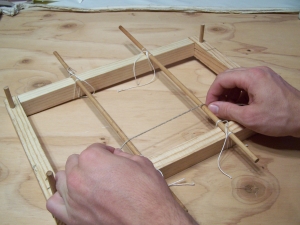
To start the warping process, cut a piece of linen about 20 ft long for the warp string. Locate the center, and lay it across the dowels at one side. This portion of linen between the dowels will form the first warp. It will be the only warp that is made of a single strand; all the rest of the warps will be two strands each.
Pull the ends of the warp string up through the center of the dowels, and swap the ends between your right and left hands.
Repeat the last step several times as shown.

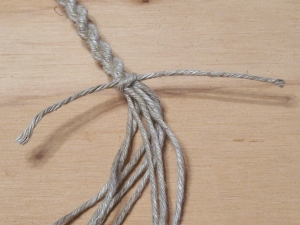
Continue until there 19 loops around the dowels. There will be a total of 20 warps of two strands each, but the last warp doesn't get looped.
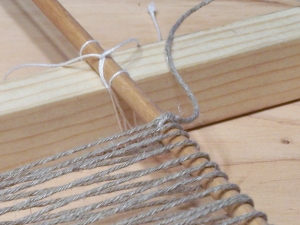
Tie off the two ends of the warp string with clove hitches. At this time, if the warp is loose, it will need to be tightened. Any slack can be worked in the same direction as the warping was done. The clove hitch knots can be used like a ratchet to finish the tightening.
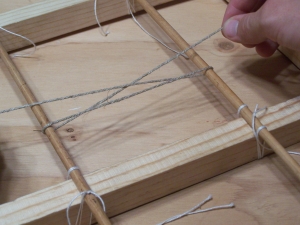
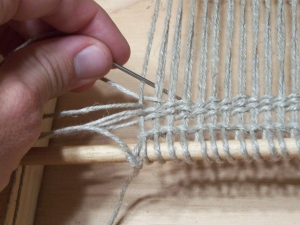
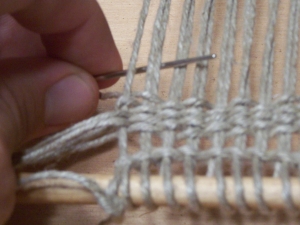
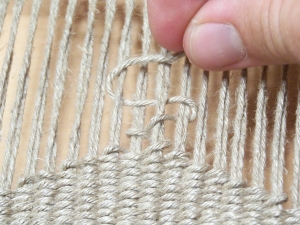
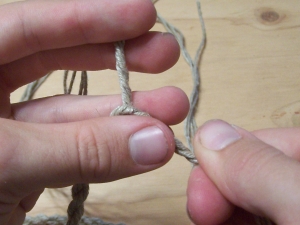
The warp now needs to be secured to the dowels. A single row of twined weft is used for this purpose. Take a string, about 16 inches long, and make a loop around the first warp. Make sure that the loop is in the middle of the string, and that one end is coming up through the warp, and the other end is going down. The end that is coming up needs to be next to the dowel.
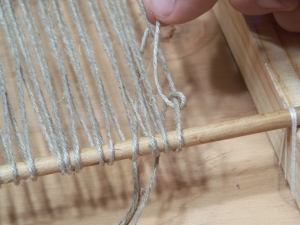
Take the end that is going down and bring it up through the warp so that is passes under two warp strings. Then take the other end of the string and bring it down over the same two warp strands. Make sure that the end that is now coming up is closer to the dowel.
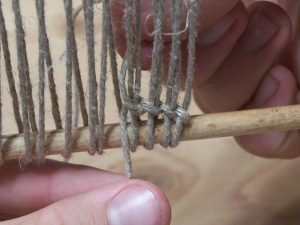
Repeat the process of taking the down-strand up and the up-strand down, always making sure that the new up-strand is next to the dowel. It is easier to work if the loom is stood up on end.
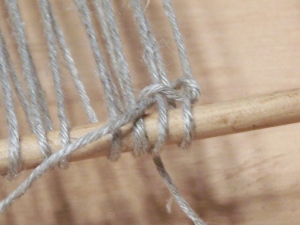
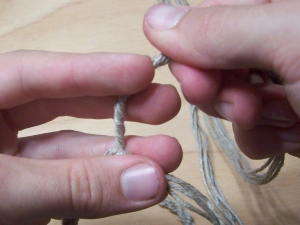
Continue this twining all the way across the warps.
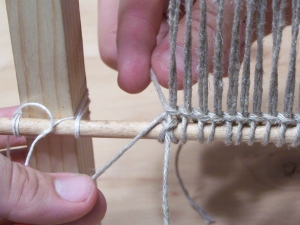
Tie the two ends of the twined string together around the dowel.
Repeat the process along the other dowel. Aside from securing the warp to the dowel, the twining also bring the warps together so they lie flat, and keeps them evenly spaced.
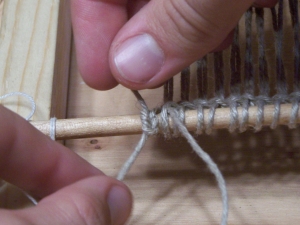
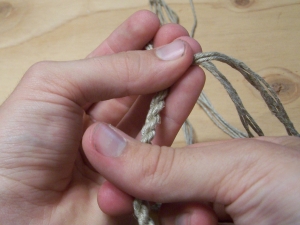
Tie the dowels to the four corners of the loom. If you are not using a loom that has pegs at the corners, tie the dowels to the frame itself. Once the ties are in place, the string that was used to lash the dowels onto the frame can be removed.
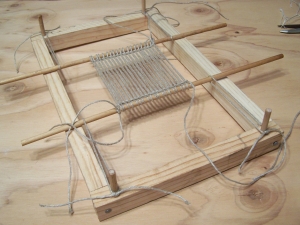
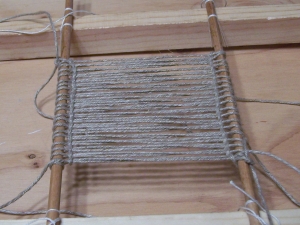
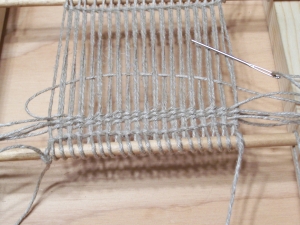
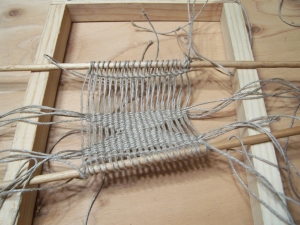
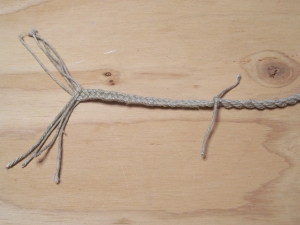
Here is the loom with the warping finished. The actual weaving can now begin.
IMPORTANT NOTE: When I was taking the photographs these instructions, I didn't realize that I had turned the loom around at this point in the process. So the single strand that was the first warp at the right side of the loom is now the last warp strand on the left side. It doesn't matter which way the loom is, but I want to point out this photographic inconsistency to avoid confusion.

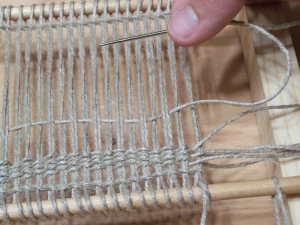
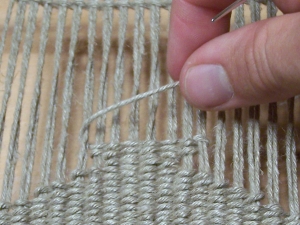
To begin weaving, first cut eight 7.5 foot lengths of linen. These will form the cords of the sling, and they are woven through the warp before the rest of the weaving. Take one of the strings and, using a needle, weave it through the warps going over-under-over-under.
Here you can see how it looks when it is woven all the way across. Pull it through until there is the same length of string coming out both sides of the loom.
Take another of the cord strings, and weave it through like the first, but start by going under instead of over.
Once the second string is woven through, push the two strings together. Also, try to make sure that the strings go up and down around the warps. If the warps go up and down instead, the sling will not come out right. It may be necessary to work some slack into the strings if they are too tight.
Weave two more cord strings through in the same manner as the two just completed. Make sure to start each one in the opposite way from the previous one. That is, if the last string started by going over the first weft, that the next string starts by going under. Set the remaining four cord strings aside for now. They will be woven in at the other side of the pouch after the rest of the weaving is finished.
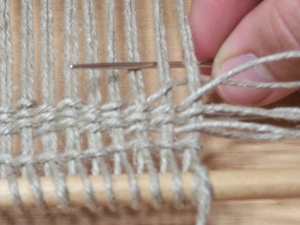
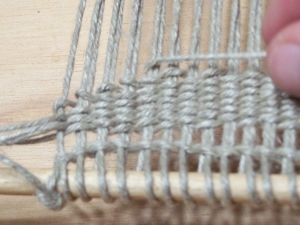
To weave the main portion of the pouch, cut a 12 ft. length of linen. This strand will form the weft for the rest of the pouch. Begin weaving with this weft the same way as the first cord strand.
Weave it all the way across, and pull it through until there is only 2-3 inches remaining and the right-hand side.
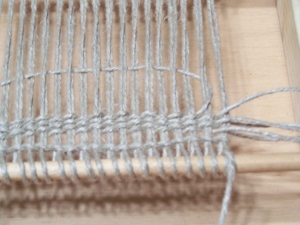
Weave with this weft back across the warp. Be sure than the weft goes around the last warp strand.
Here you can see the weft going back across the warp. Here I should mention a good way to avoid pulling the weft too tight. if the weft is pulled so that if forms an arch shape from one end of the work to the other, it can be worked down against the weaving so that it will go up and down around the warp. The extra length that comes from making the arch shape (instead of the weft being pulled so that it forms a straight line across the warp) gives enough slack to be worked against the weaving in the proper manner.
From this point on, the weaving will be done in a decreasing manner. That is, each time the weft is woven to one side of the loom or the other, it will be brought around one less warp strand than it was on the last row. So, to start the next row, bring the weft under the first two warps so that when it is pulled through it will not go around the first warp.
Here you can see how the weft has skipped the first warp.
Do the same thing on the other side of the weaving, so that the last warp is skipped.
When you come back to the right-hand side again do not go under the first warp, but bring the weft up with to warps on right side of the warp. Now the weft can go back skipping two warps.
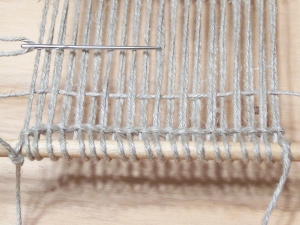
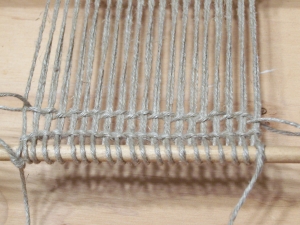
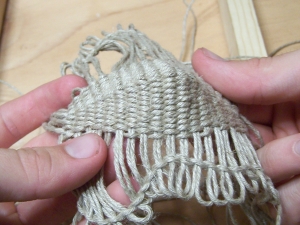
Continue to skip a warp strand at each end. Here you can see what this looks like after several rows.
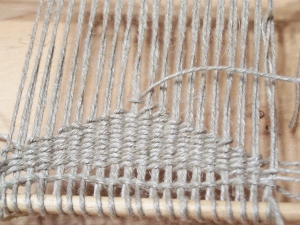
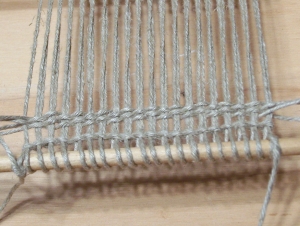
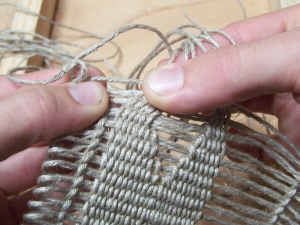
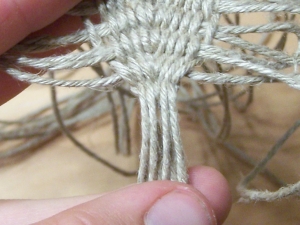
Keep working in this manner until down to only two warps. At the center, you need to have gone around the center-right warp, and then gone around the center-left warp. The weft is now ready to be woven towards the right. Your work should match the photograph. This completes the first half of the pouch.
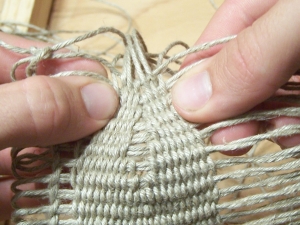
You will now begin to increase the number of warps that crossed on each row. It is merely the opposite of what you have been doing for the first half of the pouch. In this photograph you can see what the first two rows of increase look like if they are expanded out.
Here a couple more rows have been done, and the weaving has been pushed together.
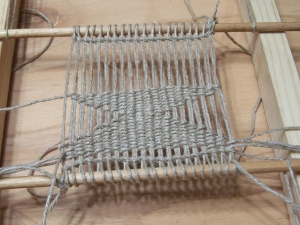
Continue to go around one additional warp at each end until you have increased to the full width of the work. Note that the weft ends at the left side of the work.
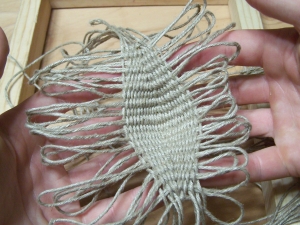
Now weave the four cord strings through like you did at the beginning. Note how the weaving forms a sort of hourglass shape.
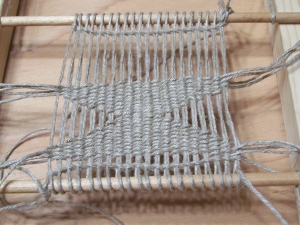
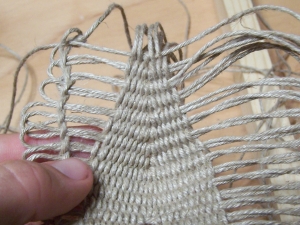
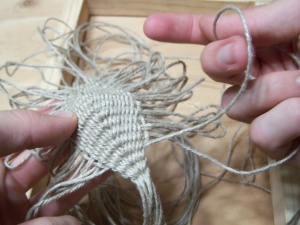
The weaving is now complete, so you can untie the dowels from the loom frame. As can be seen in the picture, there are a lot of strings going a lot of directions, so be careful to avoid a tangle.

Slide the dowels out of the warp.
You now need to push the weaving together so there is no gap down the center of the pouch. To do this, simply pull the warp and weft in opposite ways, working the weaving together.
Here you can see how the corners of the weaving are brought together. Continue bringing the weaving together until there is no noticeable gap in the center of the pouch.
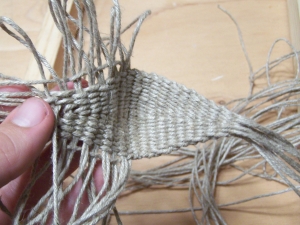
Here is half of the pouch pushed together.
When both halves have been done, the pouch will have a cupped shape to it.
Remove the twining from the edges of the warp.
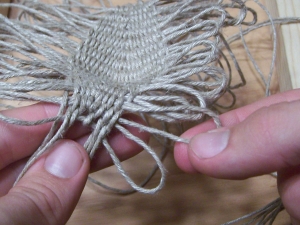
Now the warp needs to be pulled through the weaving. Begin at the end of the pouch that has the first single warp strand. Start tightening by pulling on the first strand after the first loop.
By pulling corresponding strands on either side of the pouch, the warp will begin to tighten.
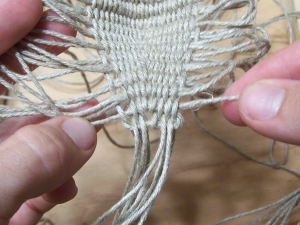
Tighten the warp firmly. Since the loops of the warp at the sides of the pouch are fairly large, They are easy to grab and tighten. But once they have been pulled tight, it is difficult to grab hold of them, so make sure to tighten well now, since is will be hard to go back and do it again.
Here a few rows have been tightened. Notice how the loops that you pull grow large very quickly.
Here you can see the first half tightened.
When working on the second half, it is helpful to tie a slip not in the cord strings to keep them form getting in the way.
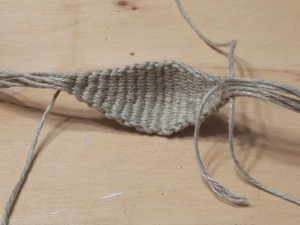
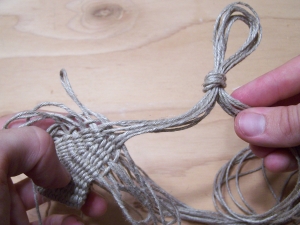
Here is the pouch fully tightened. Notice the four strings that come off of the pouch, beside the eight cord strings. There are the two ends from the warp at the right side. Also on the right is the beginning of the weft. The end of the weft is coming out on the left. All four of these cords must be secured so that the weaving doesn't come undone.
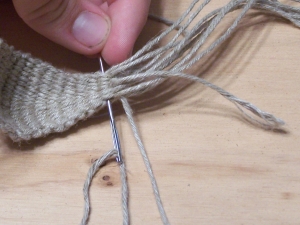
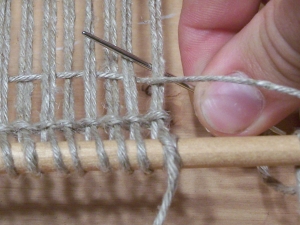
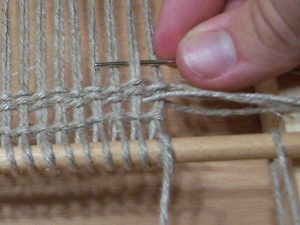
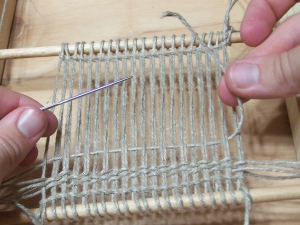
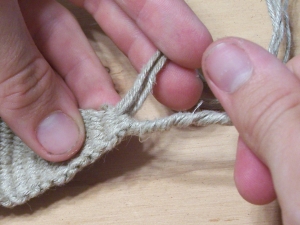
First, the warp strings are sewn through the weaving to secure them. Bring them through the weaving in along side of the second to last warp.
One warp end will come out each side of the pouch.
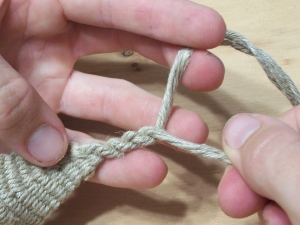
Trim the warp ends off close to the pouch, and trim the end of the weft off to about the same length as the beginning of the weft.
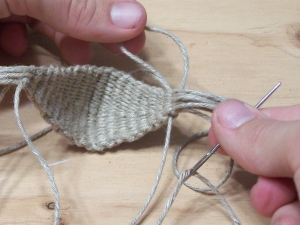
The weft ends will be secured by making them into the cords, so it is now time to start the cords. Divide the eight cords strings into two groups of four. Place the end of the weft in with one of the groups. NOTE: these instructions are for making the cords by hand. The cords could be done faster if they are done all at once. For this, twist each group of strands along its whole length, making sure that the groups are twisted in the same direction. Then twist them together in the opposite direction. It will be necessary to tie the pouch to something firm during the process, and some means of keeping the first group from untwisting while the second is twisted will be required.
Twist a short section of one of the groups. Be sure to twist the weft end with it.

Holding onto the twisted group to keep it from untwisting, twist a section to the second group. Make sure that they are twisted the same direction.
Still maintaining hold of the two groups, twist the pouch around to bring the two groups of strings together. Twist the pouch the same direction as the groups were twisted.
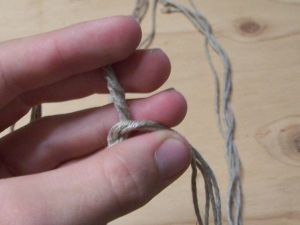
This process of twisting the groups one way and then twisting them together the other way is repeated for the whole length of the cords. A way of doing this that I found worked well is as follows: Hold one group of strings between the index finger and middle finger. Hold the other group with the thumb, third finger, and little finger. Allow the finished part of the cord to drop down along the palm of your hand.
Twist the group of strands held by the thumb, and once it is twisted, hold it tightly to keep it from untwisting.
Now twist the group held by the index and middle fingers, and grip it tightly as well.
Now twist the two groups together. Bring your fingers closer together as to allow the two groups to twist together. Repeat this method over and over. Each time will add a short section to the cords.
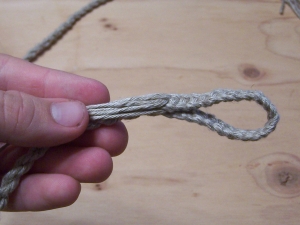
Continue until there is 6-8 inches left untwisted. The untwisted part will be used to make the finger loop.
To begin the finger loop, tie a piece of linen around the end of the twisted part of the cord to keep it from coming undone.
Dividing the eight strands into four groups of two strands, braid them for 3-4 inches in a 4-strand flat braid.
Fold the braid around and lay the strands along the cord.
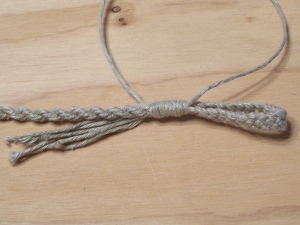
Use whipping to secure the loop.
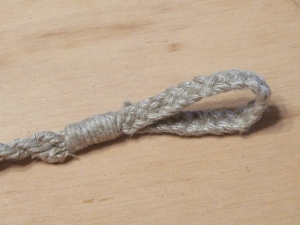
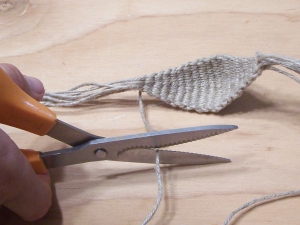
Trim off the ends of the strands, and the ends of the whipping.
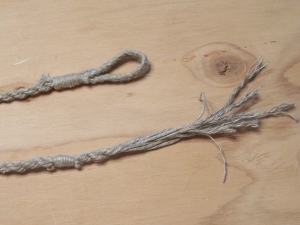
Make the second cord just like the first. Make it long enough to hold comfortably when the finger loop is on your finger. When you have determined the length you want, use whipping to secure this end as well.
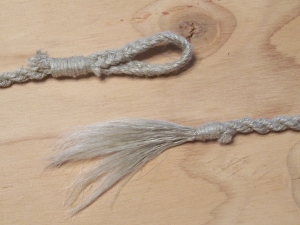
Fray the ends of the release cord to make a tassel. To do this, untwist the linen, and separate the plies. When all the plies are separated, use a wool carder to comb fray the ends. If you don't have a wool carder, you can use a comb, a stiff brush, or simply separate the fibers with your fingers. The wool carder is the fastest way, though. Cracking the tassel like a whip can also help the make the tassel.
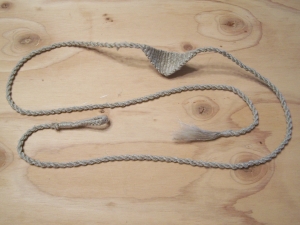
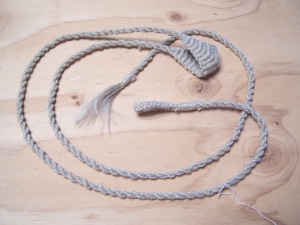
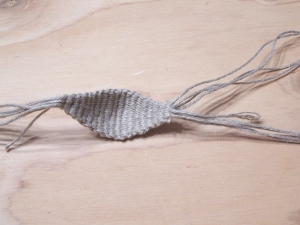
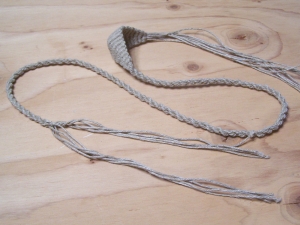
The sling is now finished.
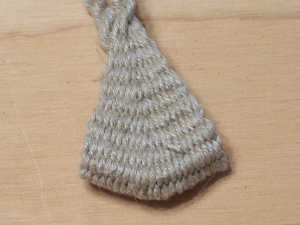
Here you can see how the warps in the pouch form a V shape when the pouch is folded flat.
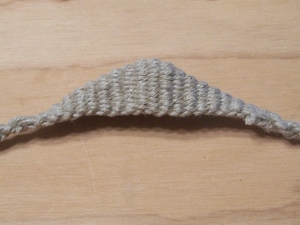
When folded flat the other way the pouch forms a triangle. This is the position that I wove the pouch in when I used my triangular loom.
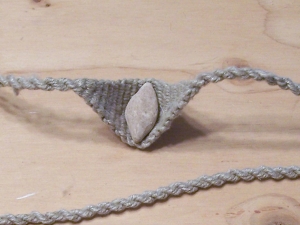
Here you can see how the pouch holds a Roman lead slingshot.
Directions for making a replica of the original Tutankhamun sling.
Having not had the opportunity to examine the original artifact, I can not know for sure what the structure of Tutankhamun's sling is. So, these directions are based only on my observation of the Burton photograph, and I had to guess quite a lot.
The above directions, at least the weaving portion, demonstrate the principles of making a Tut sling. Only a few details need to be changed. First, finer linen must be used. For my first reproduction, I used 10/2 lined rug warp, and I think this is about the right size. Two colors are required if the light stripe is to be duplicated.
The number of warps needs to be increased from 20 to 48, and the number of strings for the cords from 8 to 16.
When I made the sling on my triangular loom, I did not decrease one warp on every row. On most rows I did, but sometimes I would weave two rows before decreasing. This was because I had to make the shape of the pouch match the shape of the loom, and if I decreased every row, it was too fast. Now, since my reproduction is not necessarily accurate, there is no particular reason to copy what I did, but if a wider pouch is desired, this is a way to do it. If the third photograph from the bottom (above) is studied closely, it can be seen that the V in the weaving is not as sharp of an angle as in the original sling. Adding extra rows between decreasing warps is a way to correct this. Another way is to twine the warps more tightly at the beginning, so that the warps are closer together.
For the contrasting stripe, you need to change wefts. A good way I found was to sew the end of the old weft out through the weaving along a warp, and sew the new weft in through the same way. This is very similar to sewing the warp ends through in the instructions above. When the stripe is thick enough, change back to the original color, and weave across the center to the point where the stripe should start on the second half of the pouch. The rest is just the opposite of the first half.
The cords on my first reproduction were a 4-strand round braid. I used this braid because the sling to the left in the photograph (not the sling I copied) appeared to have 4-strand braided cords. Since I couldn't clearly make out the cords on the sling on the right I elected to use the 4-strand braid. In this tutorial, the cords are plied together, rather than braided. This was done on another Egyptian sling that is in Manchester Museum. After looking at the results, I would lean towards braided cords for Tutankhamun's sling. To make the cords braided, simply divide the 16 cord strings into 4 groups of 4 strands and braid with the 4-strand round braid. The finger loop is made the same way as the instructions show, but with 4 strings per strand.
These are the only changes required. It takes a great deal longer to weave the 48 warp pouch that the 20 warp version. There is more than 5 times the amount of weaving, and working with the finer linen is more difficult. The thicker linen naturally makes a thicker, more durable pouch, so if you are going to use the sling extensively, I would recommend the thicker linen. The instructions can be made to work with any size pouch, so this is a very flexible design.
"So David prevailed over the Philistine with a sling and with a stone..." I Samuel 17:50
Home About Information & How To's Products Gallery Links Contact
Copyright by Timothy Potter